"STITCHING MENDS MY SOUL"

Showing posts with label Siggy Tutorial. Show all posts

Wednesday, January 7, 2015

SIGGY TUTORIAL FOR SPRING THAW RETREAT

Lucky me!  I will be going on a retreat in March and we'll be swapping siggies.

Here's the tutorial for how to make them.

Fabric:  Please use quality prewashed 100% cotton quilting fabric.  You'll need a light solid (any light color) and one other fabric.  This can be any quilting cotton  --  something to reflect you, or even just scraps you already have.  Your choice.

For each siggie, cut one light square 3.5" and two other squares 4.5".


Cut the print (or whatever) in half once, on the diagonal.


Finger press them in half to 'mark' the middle of long edge.


Finger press the solid light in half too.


Line up those fold marks.


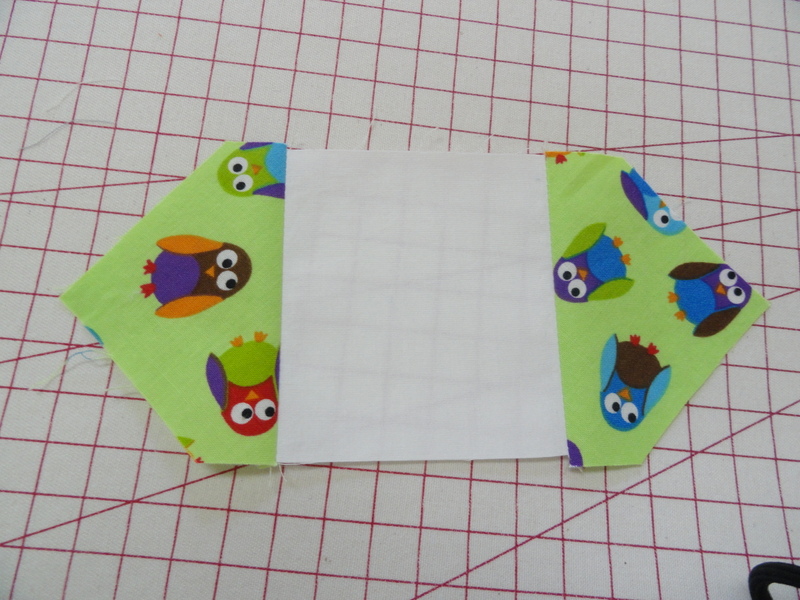
Stitch two of the triangles to opposite sides of your square.


Trim off the excess points.


Press the to the outside.  Now line up the other triangles.


Stitch them on to the opposite sides.


Press to outside.  Sloppy looking isn't it.  That's ok.  Leave it that way.


We will trim the ones we receive to 5".  That way they will all be the same for stitching together (we all trim a little differently).

  Yes, leave them 'sloppy' to swap.

Below is shown how it will turn out after we each trim our own.


Now the fun part.  Sign your siggies.  Please include your name and where you are from.  You might want to add "Spring Thaw" or similar.

Siggies are easier to sign if you press freezer paper to the back.

Please use only permanent acid free pens to sign -- the kind you find at quilt shops, etc., for labels.

You can also use stamps, but be sure your ink pad is permanent and for fabric.

Please heat set any ink you use (press 10 seconds).

Those with embroidery machines could use that to make their centers.

Or you could hand embroider.

You could add yo-yos, or other embellishments if you want.

Or just sign your name and info.

As simple or fancy as you want is fine.  It is all good.

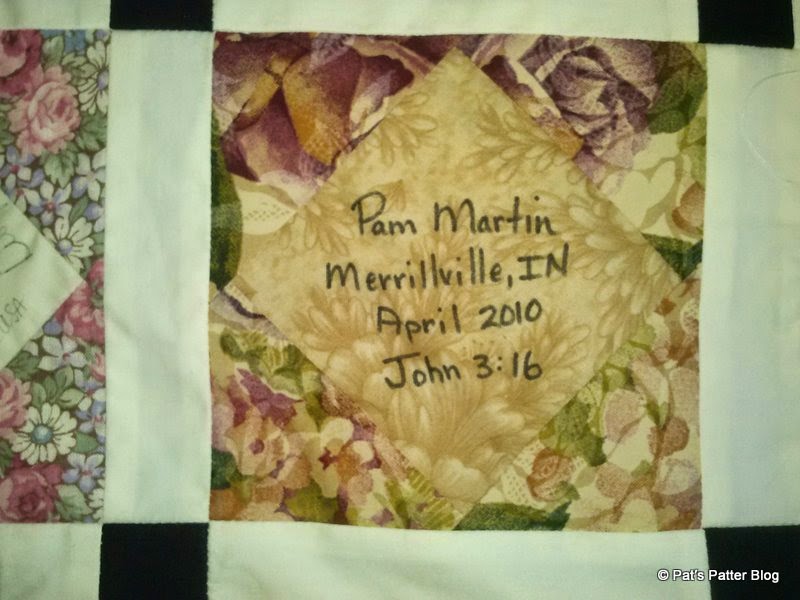
These are samples from a swap I did in 2010.


For some techniques you might want to embellish before assembling the blocks.  For others, it is easier to decorate/sign after they are finished.  It's up to you.

Bring one siggie for each person at the retreat.  Nan will keep us updated with that number.

These stitch up very quickly, assembly line style.  They will be a spectacular memory of everyone who came to retreat.  At 2016 retreat, we can show-and-tell what we made with them.  A little wall hanging?  A tote?  A cover for your machine?  What will you dream up?

If you have any trouble or questions, just ask.  This is meant to be FUN :) 

Wednesday, April 11, 2012

SIGGY TUTORIAL UPDATED

I've been  sewing my DJ Siggy Swap blocks for the 2012 swap, and realized I don't make them exactly like my former tutorial on my blog.  I've found a quicker/easier way.  So here it is.  This way is now in my tutorial link too.

 Cut one 3.5" light square for the center.  Cut two 4" squares for the triangle sides and slice them in half on the diagonal.

 For triangles one and two, line up your ruler with the opposite diagonal line points, on 1.75" (square is turned in this pic).
 Slice off the tips.
 And again on the other side.
Now the first two triangles will line up exactly with your 3.5" center square.  No need to fold and finger press the center.  No need to guess how much to cut off the tips.  It fits perfectly.  This is the new improved part.  Way faster!
 Sew the first triangle on, and then repeat with the opposite side, triangle two.
 Press to set seams.
 Then press open -- seams to the outside.
 It's easy to eyeball the third and fourth triangles, centered, so there's no need to trim the tips off those.
 Stitch, and press to set seams.

 Open out and press the third and fourth triangles..
 Voila!  Here's the siggy.  Not not trimmed to 5" yet.  For the International Siggy Swap trim it up.  However, for the DJ Siggy Swap send it in as is.  We all trim our own.
It's way faster this way.  I made 50 today in no time.  Of course I still have to sign/stamp/embellish the siggy, but the construction was a snap!

Hope this helps get these done quickly for you.

Wednesday, March 25, 2009

SIGGY SEASON


This is my second year to make siggies. They are small squares that quilters love to swap and collect. There's a large Siggy Swap on the Dear Jane list every year. There's also an International Siggy Swap that goes on too (DJ is international too though). I added a link to the international swap on the side of my blog.

Pictured is the Siggy block I've been using on the International Swap in 2009. My DJ swap blocks will be similar, but I have selected a cherry fabric to represent Michigan, and oranges to represent Florida. I'll have two corners of each.

If you are interested in swapping siggies one-on-one with me, please email me at: Nana.Quilts@gmail.com

Here's the directions for making them.

SIGGY BLOCKS

FABRIC:
Use only quilt shop quality, pre-washed, 100% cotton fabric.

CUT:
Center: Cut one 3.5 inch square of light. This may be white, off-white, or any light color. Quality muslin works well. Do not use white-on-white, as ink doesn’t adhere to it well.

4 Corners: Cut two 4.0 inch squares of a fabric of your choice and cut each once on the diagonal.

SEW and PRESS:
Center and sew two triangles on opposite sides of the center square.
Press seam toward triangles. Trim off the extra ‘wings’.
Center and sew the other two triangles on the remaining sides of the center square. Press.

DO NOT TRIM:
Receivers like to trim their own blocks. Different people do this differently, so even though they may look a tad ‘sloppy’ not trimmed up, resist the temptation and send them as is.

SIGN:
Use a Pigma® pen, or any waterproof, permanent, pen that is intended for fabric to sign your block. The color is your choice. Please include your name, state and country. It’s easier to sign your blocks if you put them on sandpaper or press a piece of freezer paper to the back first. Press to set the ink. You may choose to embroider your information if you want to. If you use a rubber stamp, be sure your stamp pad is waterproof, permanent, intended for fabric ink (like VersaCraft).

EMBELLISH:
You may add any washable embellishments you want to. Plain Janes are welcome too.


SEND:
Most of all, have fun trading Siggies with others around the world!