

Or, "Oh my stars! Why don't my paper-pieced blocks come out the right size, or match up???"
I'm no expert, but I am happy to share what I've leaned about paper piecing from trial and error through the years. I hope you find it helpful.
There are many fine tutorials on-line about paper piecing, but I'm including some of the finer points that I didn't come upon for years. Maybe it can save someone some headaches! These are tips from many various sources.
I am not affiliated with any products, but I do highly suggest using Carol Doak Foundation Paper and the Add A Quarter Ruler. I always use both. I pretty much follow the directions on the Add A Quarter ruler for its usage. In this tutorial I use it with an index card. For larger blocks I use a strip of template plastic instead of the index card.
For this tutorial, I'm using a very simple, 8-piece, 6.5" UF (unfinished) size block. But the techniques shown here will cover all you need to get those tiny blocks with a zillion pieces to come out better too. Notice I said "better." I don't claim to be perfect! My blocks certianly aren't always just right!
Let's get started!
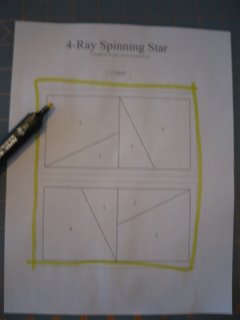
First things first. Print your pattern. As I said, I use Carol Doak's Foundation Paper for this, which I buy at the big store with a coupon. Yes, you can go cheaper. However this paper won't shrink when you iron it (you can imagine how that affects finished size!) and it won't jam your printer. It was meant for this, and worth it, I think.

Then take the time to measure your printed pattern. This line should be 1". OOPS!!! It's 7/8". Will that 1/8" make much difference? YES! Stop right here, and correct this!
The most common reason this happens is that when you printed your pattern, your printer was set to 'Page scaling: fit the page,' or something like that. It should be set to "Page scaling: none."
Unless you don't care what size your block turns out, you must fix this and make sure that little line measures correctly. They are there for a reason, LOL! So, back to the printer for me.

Now it measures right on! It's out of focus, so it might be hard for you to see, but trust me, it's exactly 1".

Use a highlighter to mark all around the outside edges of your pattern. You'll see why later. This is a tip I learned from the Dear Jane's.
Unless your pattern is all in one piece (rare) you will need to cut it into sections and work on one at a time.

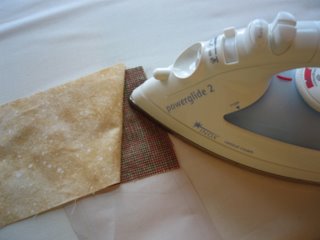
To begin, you need a piece of fabric large enough to cover your #1 piece on your pattern. Pin it to the back of the paper, with the right side of the fabric facing out. Hold it up to a light if needed, to make sure it covers all it should.

In this photo you see the paper side, once I have that first piece in place. I'm going to place an index card right along that seam line, and then fold the pattern back, against the index card.

This photo shows the pattern folded back against the index card, right on the seam line. Notice I have flipped the block in this picture. The pin is at the bottom here, under the folded paper.

Trim the seam allowance with your Add A Quarter ruler.

Position your next fabric right sides together with the fabric on the back. Flip it to make sure it will cover where it needs too.
Personally, I don't worry about using the smallest possible piece of fabric. I will use the trimmings later in crumb blocks or my DGD's will use them for play. I hate it when I sew and then find the piece is too short. Avoid that frustration by not being a fabric miser at this stage, especially at first.
Once you are sure it will cover, fold the pattern back and trim the seam allowance with your Add A Quarter ruler. Flip the paper out flat and stitch the seam.
Continue on this way piecing the entire section.

I always get up and press every seam with my iron. I know you'll see directions saying a finger press is fine, or to use one of those wooden pressers, or to place your iron and ironing surface in arm's reach so you don't have to get up to press.
I don't do that. First, I do not want to sit at my machine for long stretches without getting up. Sitting for long time isn't good for you. Getting up and moving is one of the biggest advantages of machine work, over hand work in my opinion. Second, I like a nice, iron-pressed seam. It all turns out better that way.
Some of us were taught that you don't need to backstitch, or otherwise fasten seams when paper piecing. I beg to differ! How disappointing it is to have a block fall apart when you remove the paper, and that is why it does. Seams that cross the outer edge of the section have a better chance of holding up (but why chance it?), however, seams that end in the middle of the section and will be met by another seam going the opposite direction REALLY need to be secure!
I use the tack feature on my Janome. But if you don't have that feature on your machine, take a few backstitches, or when removing from the machine, tie the ends of the thread together. Do something to hold that seam!
The seam I'm about to sew in this picture is what I'm talking about. I will need to tack when I come to the end of the seam.

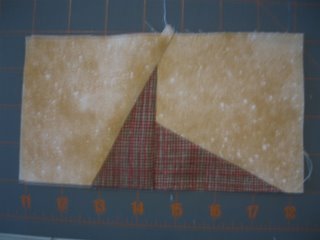
This is the back of one section completed. No outside edges are trimmed yet. I need to make two the same for this pattern. Some patterns have many different sections, but the technique is the same.

This is what the front looks like at this stage.

Here I am trimming the seam allowance that isn't highlighted. It's an interior seam of the block, so I need to trim it before proceeding. I line the ruler up with my 1/4" line of my ruler on the seam line of the paper. I will cut with the edge of the ruler. If it lines up perfectly with the cutting line on the paper, good for you! You have a perfect seam to work with here. But if not, don't worry about it. Trim with the ruler, ignoring the cutting line on the paper. Just line up that seam line with the 1/4" on the ruler. You get a perfect 1/4" seam allowance to work with too!

Here's the back, trimmed.

Here's the right side.
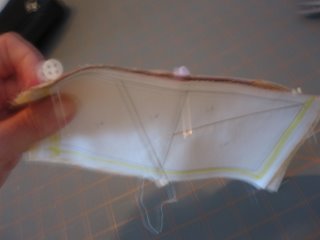
Here are my two halves ready to join. Notice I have a nice trimmed seam to work with in the center, but my outer edges of both the paper and fabric have extra sticking out.

Find your match points. What are they? Points on both sections that are supposed to line up, such as seams and center points on this block. Insert a pin straight through the pattern and fabric of one section, then go through the fabric and paper of the other section, coming out at the opposite match point. Look at both sides. The pin needs to enter and exit at match points. The pins stick out perpendicular to the block, holding the match point perfectly in place.
In this block I need to line up my center match point and both edge match points. Some patterns have more. Always match the seams and anywhere else it is supposed to line up.

Here are my three pins sticking out. It's out of focus and looks like 6! Yikes! I need a new camera!
Leave the sticking out pins in place while you insert pins flush with the fabric to hold the match points.

Then remove the sticking out pins that are perpendicular to the fabric. Leave the pins that are flush with the block in place for sewing.

Here's the back of my block, after stitching.

It is well-worth investing in a square ruler the unfinished size of your blocks. I prefer the ones that center the block and have the 1/4" seam allowance all around the outside (some have 1/2" extra on 2 sides instead, which makes it harder to center).
Center the ruler over the back side of your square. If the edges line up perfectly with the cutting line of the block paper, good for you! My block is a few threads short on all four sides. I will follow the ruler to trim my block, not the cutting line on the paper. That's why I built in that extra fabric all around the outside of the block -- just in case!

Trim, using the centered ruler. It should match the cutting line of the paper pattern at the edge, but if not, don't worry. Follow the ruler edge.

Remove the paper carefully.

Because I used that tack stitch, my seams are secure, even when removing the paper.

And here's my finished block, perfectly sized and with a nice match point in the center!

I do hope you find this helpful. Email me if you have questions.
5 comments:
GREAT tutorial with a lot of the tips I've discovered, too. I enjoy paper-piecing!
Excellent Tutorial!
I've been paper piecing since 2005(?) and I LOVE IT!!!
But I can still learn some new tricks: getting up and using the iron .... DUH!! I think maybe that's why I had a sore butt, yesterday evening! LOL
And, I liked the "marker line" around the block, idea!
Soooo... I learned something from your great tutorial!
Tks a bunch, my friend!
Rosa
This is a great tutorial, Pat! You told me about the "highlight the outside edges" tip a couple of weeks ago, and it makes my blocks SO much better, because I tend to end up with my blocks a little small. That tip saves me, because then I just trim the finished block at the end, and it always measures the correct finished size! :o)
Great Tutorial. I have done some paper piecing but you can always learn and this is very helpful.
Great tutorial! I love paper piecing, and I have taught it at my guild.
I love Carol Doak too!
Micki
Post a Comment